I was recently involved in a conversation on how to have the easiest way to maintain a XAML view across a UWP (Universal Windows Project) a Windows 8.1 and Windows Phone 8.1 projects. There are a few options and the most straight forward way to do it with a UserControl residing in a Portable Class Library. However…
What if you wanted to have tailored code for each without littering your code with #ifdef but still share a XAML view? The XAML View might be what you’re looking for. This is a tutorial on how to do just that. An example project is available for download at the end of the article. Let’s get started:
Step 1:
Create a new 8.1 Universal app

Step 2:
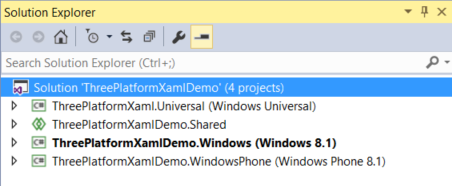
Move the Shared, Windows and Windows Phone projects out of the virtual folder and delete the folder (you can cut/paste or just click and drag them). The solution should look like this now

(Note: If you’re doing this to a solution that has many other projects, you might want to skip this step and add the UWP project to the virtual folder instead)
Step 3:
Add a new UWP project to the solution and name it the same as the 8.1 app, but with the Universal suffix.

(Your solution should look like this now)
Step 4:
Add a “Views” folder to each of the projects

Step 5:
Within the Universal project, right click and Add > New Item > XAML View

Step 6:
Move the new XAML View to the Shared project’s Views folder and change the namespaces in the view to match

Step 7:
Delete App.xaml from the Universal project and add a reference to the solution’s Shared project (Note: this is in the new Shared projects references section)

Step 8:
Here’s where the magic happens. We’ll be adding a code behind for this view in each of the projects! I’ll break this down into sub-steps:
- Add a new class to the Windows 8.1 project’s Views folder (Add > New Item), name it as if it were the code-behind for the view. In this case it would be SharedPage.xaml.cs
- Change the namespace of the class to Views
- Add the public, sealed and partial modifiers to the class
- You’ll next need to inherit from the Page class
- Add a page constructor
- Now you can copy and paste this new class into each of the platform projects (remember, we do not need it in the Shared project)
This is what it should look like

Step 9:
You’ll need to quickly pop into the Build Configuration Manager and check off Build and Deploy for the Universal app (you can find Configuration Manager in the target dropdown or in the Build menu)

Step 10:
Lastly, for the purposes of this demo, go to App.xaml.cs and change the initial launch target (MainPage) to be the new shared page (SharedPage). I could have put a button on MainPage for each app, but let’s keep this tutorial as short as possible.

Final result!
This is the same XAML View compiled with different code-behind files 🙂

(NOTE: I put a TextBlock on the SharedPage and update the text in each constructor to show which platform launched it. Here are the WP8.1 emulator, Windows 10 PC and Windows 10 Mobile Emulator running their apps all showing the same XAML view).
Source Code
Download the Sample App Source Code From Here
Bonus:
The Telerik Universal Control can be used in the shared page as long as each of the projects have a reference to the Telerik UYI for Windows Universal DLLs. Send me a tweet and show me what you’ve done, I’ll RT your awesomeness!

